Tasks to be completed when creating an operating procedure (from creation to publication)
|
Table of contents
By default the table of contents displays Heading 1 & Heading 2 (other levels can be added)
Scope
1. Remove the icon(s) when not applicable
![]()
![]()
2. Add countries when the procedure is for a specific country (optional)
ERP
3. Remove the icon(s) when not applicable
![]()
![]()
![]()
References
4. Add the link to SAP procedures (when it exists)
Attachments
Google Drive Link
1.1 Objective of this Procedure 6
4. Roles and responsibilities 8
5. General Operational Procedure 9
5.1.2 Transactions XK02 and XK03 10
5.2.1 Searching for an existing vendor in PRS, PF1 and RCS 12
5.2.2 Mandatory documentation for vendor creation 14
5.2.3 PRS/RCS account groups 21
5.3 Creating Vendor Master Record – General Data 22
5.3.2 Manual creation on transaction XK01 23
5.3.3 Create Vendor: Initial screen - Account groups 24
5.3.4 Create Vendor: Address 24
5.3.5 Create Vendor: Control 27
5.3.6 Create Vendor: Payment Transactions 29
5.4 Vendor’s additional set up / fields 30
5.4.3 Setting a Vendor as SFP 35
5.4.4 Tax number 3 – BR Vendors only 39
5.5 Vendor enabling - other systems 40
5.5.1 Transferring Vendor to WP1 (RCS) 40
5.5.2 Transferring Vendor to PF1_020 (PF1) 41
5.6 Modifying a vendor General View 42
5.7.1 Update/Create Bank Information 44
5.7.2 Country Specificities 45
5.7.2.1 United States of America 45
5.7.2.3.2 NON BANAMEX accounts 48
5.7.2.9 Europe (all countries) 51
5.7.3 Creating a bank key on SAP - FI01 53
5.7.4.1.1 Sending the link to another email 58
5.7.4.2 Outbound via email + GCC team 61
5.7.8 Checking for a Duplicate Bank Account 61
5.8 Company code maintenance 62
5.8.1 Searching for an IP vendor 62
5.8.2 Creating a Vendor company code view – Initial screen 63
5.8.3 Creating a Vendor company code view in PF1 system 64
5.8.3.1 Creating company code view in PF1: Accounting Information 64
5.8.3.1.1 1099 information - company codes in PF1 65
5.8.3.2 Creating company code view in PF1: Payment transactions 67
5.8.3.3 Creating company code view in PF1: Correspondence Accounting 68
5.8.4 Creating a Vendor company code view in WP1 system 69
5.8.4.1 Creating company code view in WP1: Accounting Information 69
5.8.4.2 Creating company code view in WP1: Payment transactions 69
5.8.4.3 Creating company code view in WP1: Correspondence Accounting 70
5.8.4.4 Creating company code view in WP1: Withholding Tax Information 71
5.8.4.4.1 1099 information - company codes in WP1 73
5.8.5 Modifying a vendor Company Code View 74
5.9 Purchasing organization maintenance 76
5.9.1 Creating a Purchasing Organization view 76
5.9.2 Creating a Purchasing Organization View: Purchasing data 77
5.9.3 Creating a Purchasing Organization View: Partner Function 79
5.9.4 Alternative data tab - WP1 80
5.9.5 Modifying a vendor at Purchasing Organization level 81
5.9.6 Setting a vendor as ERS 82
5.10 Financial vendor (FI) addition to ZWFA05Q table: WP1/NAM only 83
5.11 Open Items check: used on vendor inactivation 85
5.11.1 Check for open PIRs (ME1L) 85
5.11.2 Check for active contracts (ME3L) 86
5.11.3 Check for open POs (ME2L) 87
5.11.4 Check for open invoices (FBL1N) 87
5.12.1 Checking issues in existing IDocs 89
6. Operational Procedure on Vendor WorkFlow Tool 91
6.3 SAP Business Workplace in PRS environment (SBWP) 93
6.4 Necessary checks before approving a request for a new Vendor record 95
6.5.1 ‘General data’ tab on VWF 96
6.5.2 ‘General data 2’ tab on VWF 97
6.5.3 ‘Phone/ Fax/ Mail’ tab on VWF 98
6.5.4 ‘Distribution’ tab on VWF 98
6.5.6 ‘File Attachments’ tab on VWF 99
6.5.7 ‘Purchase’ tab on VWF 99
6.5.8 VWF tabs in Webform requests 100
6.5.8.1 ‘WebForm’ tab on VWF 100
6.5.8.2 ‘Email body’ tab on VWF 101
6.5.8.3 ‘Banks’ tab on VWF 101
6.5.9 Blocking/unblocking and marking/un-marking for deletion 101
1. Objective and Scope
1.1 Objective of this Procedure
This document explains how Vendor Master Records should be managed by Data Controllers responsible by LAM and NAM Scope. It defines the main rules and best practices that should be applied to have the highest level of compliance and data quality within Solvay Group rules, while attending the internal customer needs. It includes Master Records creation and modification of:
Vendor General View;
Company Code View;
Purchase Organization View.
Also includes procedure on how Vendor Master Data must be managed within the VWF (Vendor Workflow) tool, the main rules and recommended practices that must be applied in order to have the highest level of compliance with the Solvay Group rules and to meet the internal needs of the customers. It includes creating and modifying Master Data through the Vendor Workflow Tool (VWF).
1.2 Scope
This procedure applies to all Vendors, Company Codes and Purchasing Organizations based on LAM and/or NAM Region. It also specifies the role of Data Controller, inside the process of Vendor Master Data in NAM and LAM regions. Using mainly the SAP ERP Systems PF1_050 (PRS); PF1_020 (PF1); WP1_400 (RCS).
2. Reference Documents
Check appendix .
3. Definitions
SBS | Solvay Business Services |
LAM | Latin America |
NAM | North America |
PRS or PF1_050 | General SAP system |
PF1 or PF1_020 | Local system, Solvay legacy |
WP1 or RCS_400 | Local system, Rhodia legacy |
PI1 | Payments system |
DBA | Doing Business As |
VN | Vendor |
OA | Ordering Address |
IP / PI | Invoice Presented By |
GS | Goods Supplier |
TIN | Taxpayer Identification Number |
FI | Financial vendor |
GPS | Global Purchase and Segmentation Team |
FKA | Formerly Known As |
CTX | Corporate Trade Exchange |
ACH | Automated Clearing House |
ABA | USA routing/ bank number |
ERS | Evaluated Receipt Settlement |
SFP | Supplier Finance Program |
IBAN | International Bank Account Number |
VWF | Vendor Workflow |
PIR | Purchaisng inforecord |
PO | Purchase Order |
CICC | Coordination Internationale des Crédits Commerciaux |
NAFTA | North American Free Trade Association |
4. Roles and responsibilities
Requester | The requesters are responsible for collecting all necessary information from third parties to submit a vendor creation or modification request. Request involving vendor’s general data and purchasing organization’s creation or modification should be sent by Self-Service Tool which will create a Vendor Workflow. For vendor’s company code updates the request can come via Freshdesk Tool. |
Buyer / purchasing responsible | The purchasing responsible will receive the VWF on their inbox after its submission. The buyer should review the request and validate its actual necessity. They make sure that the purchasing segment and purchasing conditions (i.e. payment terms and incoterms) are in line with the purchasing rules defined by the Service Line. After validated, buyer approves/ rejects the request, and the VWF follows the SAP flow of approval. |
Data Controller | Data Operations Team is responsible for double-checking the requests received to grant data compliance. The process regarding Vendor General View should be managed in PF1_050 (PRS) system and the Data Controller should confirm if changes were transferred to the local systems (PF1 and WP1). Before processing the request in PRS, data controller should perform necessary checks in order to avoid duplicate vendors set up in the system. Both Company Code and Purchase Organization View should be managed directly in Local System, PF1 or WP1, depending on what was requested. It is Data Operations’ responsibility to check whether all the required information to set up a vendor account was provided. If the request was entered via Freshdesk, Data Team should inform the requester (authorized agent) of the completion of their solicitation. In case of a VWF, an automatic email will be sent to the requester. |
Vendor | Vendor (or Supplier) provides goods or performs services to Solvay companies and submits the requested address, tax and bank data. Sometimes the supplier act on Vendor Workflow by filling out the web form with their data. |
5. General Operational Procedure
5.1 Main SAP transactions
All transactions described in this section work the same way for all systems. However, creation of new vendors are made only in PRS and extended to local system by the system job. Company Code View and Purchase Organization View are only created/extended in Local Systems.
5.1.1 Transaction XK01
This is the transaction for vendor creation. We can create new vendors (PRS only); new Company Code Views (Local system only); Purchase organization views (Local System Only).
PRS: Central System for all general vendor information;
Local Systems: PF1_020 (Solvay Legacy) and WP1_400 (Rhodia Legacy).

01 – Vendor Number: fill the vendor number already created in PRS, to extend to a new Company Code or Purchase Organization View in local system;
02 – Company Code : fill with the Company Code to extend vendor to. It’s mandatory to fill the vendor number;
03 – Purchasing Organization : fill with the purchasing organization to extend vendor to. It’s mandatory to fill vendor number;
04 – Account Group : Used only when creating a new vendor in PRS (central system). Vendor number should be left empty. Company Code and Purchase organization should be filled only in local system;
05 – Reference: used to create a new Company Code and/or Purchase Organization for a vendor, using another one as parameter. The information will be copied from the one filled in Reference.
5.1.2 Transactions XK02 and XK03
Both transactions are very similar and work in all systems in the same way. The main difference between them is that XK02 is used to modify data and XK03 is used only to display data.

06 – Vendor: fill the vendor number to check/change;
07 – Company Code: fill with the Company Code to check/change;
08 – Purch. Organization: fill with the Purchase Organization to check/change;
09 – General Data: select views from Vendor general data to work on;
10 – Company Code Data: select views from Company Code data to work on;
11 – Purchase Organization Data: select views from Purchase Organization data to work on.
5.2 Preliminary checks
All mandatory information and documentation must be provided by the requester. Data Operations Team performs quality checks in order to insert the most accurate data in SAP system.
Data Controller will check for duplicates before completing the request and communicate with requester inside the tool if any data is missing, confused or duplicated.
Some small adjustments can be performed by Data Controller in order to grant data accuracy and system standardization.
5.2.1 Searching for an existing vendor in PRS, PF1 and RCS
This is a mandatory task that needs to be performed before every vendor creation, aiming to avoid duplicity of vendors in SAP, which can cause double or wrong payments in the future. Search for existing vendors by using transaction XK03. This search works in the same way for both central and local systems.

12 – On Vendor, just select the field by clicking on it and the “match box” will appear, click on it or just press the shortcut button “F4”.
The next window will provide parameters for many checks. To search for an existing vendor, the Data Controller should perform multiple searches using different spots in order to do not limit the search. The main spots are: Name, Postal code and Tax Number.
The search by name, and postal code could be performed in Vendor (General) tab, and the search by tax number should be performed in tab Vendor by Tax Information.
A few tips on how to use the search engine:

13 – Postal Code: insert postal code referenced. It can help to find vendors with contracted names or misspelled;
14 – Name: insert the most significant part of the vendor name between “*”. It will grant a more accurate search. It shows all vendors that have any character written before or after the name typed;

15 – Tax Number 1: Federal Tax ID (US) - RFC (MX) - CNPJ (BR) - CUIT (AR);
16 – Tax Number 2: Social Security ID (US) - CPF (BR) - NIP (AR).
If the vendor is not created in the system, then proceed with its creation. If it is already created check for possible updates and inform the existent vendor number to the requester.
5.2.2 Mandatory documentation for vendor creation
There are some mandatory documentation and information that should be present on the request of a vendor creation and modification, it vary depending on the country. Hereunder it is possible to find the specificities for US, BR and MX. Other countries in NAM or LAM do not have mandatory documentation that should be attached to the request.
5.2.2.1 United States
Companies located in USA have a form called ‘ W-9 Form’ : officially called "Request for Taxpayer Identification Number and Certification". It is used in the United States income tax system by a third party who must file an information return with the Internal Revenue Service (IRS).
It shows the company’s name, address, and taxpayer identification information (in the form of a Social Security Number or Employer Identification Number ).
Check an example below:

17 - Vendor name and DBA ;
18 - Vendor tax classification: it is used to determine if vendor will receive 1099 report from Solvay or not;
19 – Vendor address ;
20 – Vendor tax number: it can be a Social Security Number, composed by 9 numbers, in the format: “000-00-0000”, normally used by nature person. Or can be a Federal Tax ID or Employer Identification Number, composed by 9 numbers, in the format: “00-0000000”, used only by companies;
21 – Vendor’s signature and date .
The W-9 Form could be filled electronically or hand written. However, Data Controller team should receive a digital copy with a signature on it. If no W9 is attached on a creation VWF for US, the request must be returned and will only be processed when the document is presented.
5.2.2.2 Brazil
For Brazilian vendors there are no mandatory attachments. However, the requester should inform a valid CNPJ (Cadastro Nacional de Pessoa Jurídica) which is the company’s tax number, in case of a natural person tax number is called CPF (Cadastro de Pessoa Física).
Even with no attachments needed, the Data Controller team needs to consult the information of CNPJ in Brazilian government website.
To consult CNPJ, access Receita Federal Web Site and insert the CNPJ with no special characters.

22 – Vendor name : if the mane informed by the requester is different from the one on the Receita Federal, we should consider the one on the official website. Update vendor as per what is shown on this screen. If the name does not match we can have legal issues when paying the invoices;
23 – Vendor address : same as above for addresses, we should consider the one on the official website. Update vendor as per what is shown on this screen. If the address does not match we can have legal issues when paying the invoices;
24 – Vendor fiscal situation: we can only accept vendor’s creation when its ‘SITUAÇÃO CADASTRAL’ is equal to ‘ATIVA’. Anything other than that should be rejected because we can not do business with the vendor.
Now, also based on CNPJ, Data Controller must check if vendor has State Tax ID. It will be checked on SINTEGRA Website, a governmental portal.
Select the State by clicking on the two letters that identify it in the Brazil Map:

Depending on the state it brings a different screen to search companies. But basically the CNPJ is used to search for all vendors.

25 – Insert vendor CNPJ on this field and click “Pesquisar” (Search);

26 – Vendor Inscrição Estadual Number (IE): The state tax number for vendors whose main activity is selling products and not services;
27 – Vendor name ;
28 – Vendor address : this address should be the same as the one in Receita Federal Website;
29 – Vendor state situation : this information must be crossed with the one on Receita’s website (see step 24);
RECEITA FEDERAL (CNPJ) | SINTEGRA (I.E) |
Ativo | Habilitado |
Ativo | Não habilitado - baixado |
Ativo | Nenhuma ocorrencia / not found |
Ativo or not | Não habilitado |
Different from ativo | Não habilitado - baixado |
Different from ativo | Nenhuma ocorrencia |
Ativo + Habilitado : the vendor doesn’t have any restriction and can make any business;
Ativo + Não Habilitado – Baixado : the Vendor has “Inscrição Estadual” but doesn’t have the obligation to make activities as ICMS contributor. They can only make business as final consumer;
Ativo + Nenhuma ocorrência : the vendor doesn’t have State obligations (ICMS contributor);
Ativo or not + Não Habilitado : irregular status with the Government. It cannot do business;
Different from Ativo + Não Habilitado – Baixado: irregular status with the Government at two levels (Secretaria da Fazenda and Receita Federal). It cannot do business;
Different from Ativo + Nenhuma ocorrência : the Vendor does not have Inscrição Estadual and it is irregular with “Receita Federal”. It cannot do business.
Note: It is very important to check SINTEGRA website to fill correctly vendor’s tax code 3. If not checked correctly, there is a risk to have fiscal issues.
If vendor doesn’t have a valid tax number, keep this field blank.
5.2.2.3 Mexico
For Mexico vendor creation, it is mandatory to receive a PDF with their tax information, called RFC. The tax identification number is present in two parts of the document.

30 – Vendor RFC number in two different fields.
The RFC number should be placed on ‘Tax number 1’ field.
The document might also contain vendor’s address, if so system must match these information as well.
5.2.3 PRS/RCS account groups
This field is a fundamental element in SAP for piloting the creation of a new vendor.
Account groups come in the format ZXXX, and they cross information from vendor’s country and type (to what purpose the vendor number will be used). Most common account groups used for LAM/NAM:
Z3U0 : Regular vendors in USA;
Z3UA : OA Vendors (Purchasing Order Address) in USA;
Z3M0: Regular vendors in México - MX;
Z1B0: Regular vendors in Brazil - BR;
Z1A0 : Regular vendors in Argentina - AR;
Z3C0 : Regular vendors in Canada - CA;
Z1X0 : LAM master records, except AR and BR enter (South Am. Vendors (<> AR, BR));
ZQ00: Vendors from countries which don’t have a specific code;
ZZCD : Miscellaneous creditors (FI Vendors). This code is intended for creditors that bill expenses that are not purchases, such as taxes, non-negotiable fees, donations, etc.
The same company may have a record in ZXXX as a vendor, and a second one in ZZCD as a miscellaneous creditor (for example, a law company may bill law consulting and also legal non-negotiable fees).
In order to avoid duplication in the system it is advised that in such cases only ZXXX account group should be maintained.
Please note that the correct account group should be chosen based on vendor’s location (country) not in the company code vendor will be used.
For example, if creating Belgian vendor for company 5782 (Solvay Specialty Polymers), choose account group ZBEN, instead of Z3U0.
5.3 Creating Vendor Master Record – General Data
The Tax Codes (Federal Tax ID, Social Security ID, CNPJ, RFC) must never be changed since it changes legal entities information. There are few situations when the Tax Code can be changed:
When the vendor was set up without a Tax Code, it can be added later.
When it is clear there has been a typing mistake, then an amendment is allowed.
Any other situation that differs from these ones must be handled differently – a new vendor account has to be set up.
After checking for duplications and mandatory documentation in the request, proceed with the vendor creation. When creating a new vendor, check the following rules:
All the information must be entered in upper case;
No special characters are allowed, except for “&” and “#”. Delete any other one, such as:
( ) | [ ] | / \ | <> | * | “ " ' | |
, | . | ; | ´ ` | ^ | ~ |
Abbreviate as it follows (if applicable):
Term | Abbreviation | Term | Abbreviation | ||
| Street | ST | | Company | CO |
Road | RD | Incorporated | INC | ||
Drive | DR | Corporation | CORP | ||
Court | CT | Manufacturing | MFG | ||
Avenue | AVE | Limited | LTD | ||
Boulevard | BLVD | Limited Liability Corp | LLC | ||
Lane | LN | Limited Liability Partnership | LLP | ||
Highway | HWY | | South | S | |
Parkway | PKWY | East | E | ||
Place | PL | West | W | ||
| Suite | STE | North | N | |
Building | BLDG | South East | SE | ||
Apartment | APT | North East | NE | ||
| Frist | 1ST | North West | NW | |
Second | 2ND.... etc | South West | SW |
No spaces should be entered for company names with alphabetical abbreviations, example, ABC CO and not A B C CO.
FOR US: When vendor uses another name such as a DBA (Doing Business As) or FKA (formerly known as) mentioned in the W9-Form, this name should be written in the second line with “DBA/FKA” in the beginning.
5.3.1 Partner types
VN - Corporate Address : The actual vendor, it is a mandatory setup and core of master data. Where the main information are inserted and should reflect the headquarters address. It can contain accounting levels (company code) and purchasing level (purchasing organization). The other partners are always linked to the VN.
OA - Ordering Address : From where the product we are buying is coming from, it is the address responsible for receiving the purchasing orders. All additional addresses other than headquarters should be considered OAs. It is common in the US to have different ordering address from the main address. Since it is only an address, it is not extended to any levels, only linked to VN, into P. Org.
IP / PI - Invoice presented by: Remit to Address. Only financial information, used when a different company/ address will send us the invoices to be paid. It is the partner that has bank details and remittance address for payments via check. This partner should be extended to local systems at Company code level;
GS - Goods Supplier : The company that will supply the product we are buying. Extended to purchasing level (purchasing organization) and only used in WP1.
Note: There must be only ONE vendor per tax ID. All additional addresses must be set as OAs/ GS/ IPs.
5.3.2 Manual creation on transaction XK01
Please note that this process will run automatically when approving a VWF, so no need to use the XK01 transaction.
This procedure is to show how a manual creation would be performed, but Data teams are not authorized to create vendors manually, the request must come from the VWF tool, so it follows the correct levels of approval.
5.3.3 Create Vendor: Initial screen - Account groups

31 – Account Group: Select the correct Account Group according to topic 5.2.3 .
-> Press Enter
5.3.4 Create Vendor: Address
On this first screen, create vendor’s main data:

32 - Vendor’s name: as per W-9, Receita Federal Website, RFC or Requested. It should be inserted in uppercase and can not contain special characters – which causes invoices issues mainly in Brazil;
33 - Additional lines for name: if name does not fit in first line / additional name / DBA / other names. It should be inserted in uppercase with no special characters;
34 - Search Term 1: First 10 digits from DBA or Name, in uppercase;
35 - Search Term 2: Type of partner (OA, VN, GS, IP) – do not fill this field for FI vendors ;
36 - Vendor Address: Street/house number; Postal Code/City; District (mandatory for BR); Country; Region;
Postal Code in US, can have 5 or 9 digits (XXXXX-XXXX). Check here ;
Postal Code in BR will have 8 digits (XXXXX-XXX). Check here ;
Postal Code in AR will have 8 digits. Check here ;
37 - By clicking on “More Fields” button, find more fields to be filled in Address data. District is found when clicking in this field;
38 - PO Box: if applicable;
39 - Language : main vendor language.
40 - Phone, Fax and email: it’s mandatory to fill at least one telephone number and one email address. For phone and fax, always remove dashes, dots, spaces, etc. If we leave these marks on phone number, it will cause issues to generate invoices in BR. Used as best practice for all countries;
NOTE: For Brazil in order to send "Nota Fiscal Eletronica" the information NFE-XML must be added on the field Notes logged in Portuguese (PT) as image below:

41 – Comments – Reference the ticket or VWF in which the request was received.
Press Enter
5.3.5 Create Vendor: Control
On this screen, create vendor tax identification:

42 – Authorization : The authorization group allows extended authorization protection for particular objects. They are freely definable and usually occur in authorization objects together with an activity. Use HQ (Code defined internally, no impact on vendor master data);
43 – Tax Numbers : depending on vendor country:
Tax Number 1 | |
AR | CUIT number or CUIL number |
BR | CNPJ number |
CL | RUT number |
CO | NIT number |
MX | RFC number |
PE | RUC number |
US | Social security number |
VE | RIF number |
Tax Number 2 | |
AR | NIP number or CM number |
BR | CPF number |
US | Employer identification number |
VE | NIT number |
Tax Number 3 and 4 : for Brazilian vendors only – if applicable;
Tax Number 3 | |
BR | State tax number (from SINTEGRA) |
Tax Number 4 | |
BR | Municipal tax number |
44 – Tax code and Tax type: mandatory information when creating Argentinian vendors. This information should be provided by the vendor to the purchasing team and then reaches the Data controller.
45 – SCAC code: this field might be requested via ticket or VWF, leave it blank unless requested.
Press Enter
5.3.6 Create Vendor: Payment Transactions
On this screen the Vendor bank information is created (Detailed Rules will be described in section 5.7 ).

46 - Country : indicates the bank’s country, not necessarily to be the same as the vendor’s country;
47 - Bank Key : is the bank identification and can be a National identification or a SWIFT Code;
48 - Bank Account : vendor’s bank account according with the rule defined for each country (described in section 5.7 );
49 – Account Holder: vendor’s name. This field is used mainly for MX to put the vendor’s name in some special cases;
50 – Account Key (AK) : Filled in some cases according to the rule defined for each country (described below);
51 – IBAN : Only for European vendors, as described in section 5.7 ;
52 – Bank Type : An internal identification number, used to fill the payment currency. Should be filled by 3 digits of currency plus one sequential number, indicating the logical order to choose bank account. For example, if the vendor has two valid accounts for USD, insert “USD1” for the first one and “USD2” for the second one;
53 – Reference : Filled in some cases according to the rules defined for each country (described in section 5.7 ).
When finished, save.
5.4 Vendor’s additional set up / fields
5.4.1 Adding DUNS
This procedure needs to be performed during the vendor creation or later, doing a modification.
The DUNS (Data Universal Numbering System) is a global way to identify companies between several companies, markets and regulatory entities. Differently of the traditional Tax ID that each country has one, the DUNS number follow the same rules and structure independently of the country. It is very important to have a DUNS number filled because today Solvay group uses it mainly to differentiate vendors in Catalog system.
To add DUNS number to a vendor, firstly go to D&B (Company that coordinate DUNS) Portal . Select the country and click on Submit.
NOTE: It is very important to allow D&B pop-ups in order to be able to login the website.

In the center of the page, insert login and password (check internal documentation for login info). Solvay’s agreement with D&B has few users that are shared with Data Controllers in other Service Centers.
There is a list of users and passwords in a Google Doc (page 2) shared with all Data Operations team.
It is possible only one person logged in each user each time. If no users be available during a vendor creation, try again some minutes later.

It is possible to search a vendor by Tax ID, Name, Address, etc.

54 – National Identification: search for Tax ID (without “-“ or “.”) sometimes company does not have Tax ID registered in D&B website search by:
55 – Business Name : search using the vendor name. It can bring more results, double check other information, such as address, to confirm the correct company;
56 – Address : another option is to search by address, this will be more subjective, double check company name also;
57 – Go : click here to perform the search.

If performing the search with multiple options, the system will identify the number of results for each field.
58 – Results of the combined search;
59 – Results for each field separated;
60 – Click on this to see the results of the search.
Clicking on the line of the result, access the detailed information about the vendor.

Copy the DUNS number and insert it in SAP. Vendor General Data:

61 – Click on “Extra Master Data”.
Select the tab DUNS

62 - DUNS Direct code : insert the code retrieved in D&B website;
63 - Reason for the absence of DUNS : this is a mandatory field for which there are three options:
SGL (Single Location) - when the DUNS Code is found;
TBD (To Be Determined) - when it was not possible to search for it in D&B website for some reason, this status means that DUNS code will be filled later;
UKN (Unknown) - this reason should be used only when the search for the vendor DUNS does not return any results.
5.4.2 Transportation Zone
Transportation zone might be populated for vendors located in USA, Canada and Brazil. It is used for logistics purposes and the lack of this information can give some transport issues.
Make sure the modifcation must be performed on both PRS and WP1 systems.
NOTE: If there is already a workflow requesting the update of Transp Zone field, certify that the information is filled out on the request, before approving it, as the example below:

If the set up is being executed manually, go to vendor’s Extra Master data, on PF150 and then on WP1 :

64 – Click on “Extra Master Data”.
Then go to tab “Others”:

65 – RCS Transportation zone:
5.4.3 Setting a Vendor as SFP
The Supplier Finance Program is a strategy adopted by Solvay group to optimize the cash flow increasing vendor’s payment terms usually to 90 days with a special negotiation with vendor, where the payment is made to the JP Morgan bank, and the vendor can request the amount to the bank whenever they want. The global purchasing team is responsible for the negotiation with the vendor and just after that, a request to Data team is entered to include the vendor on the SFP Program.
They will inform usually via ticket that the vendor should be set to SFP and the new payment terms to be filled.
In transaction XK02 in PRS, enter vendor # and then:

66 – Click on ‘Extra Master Data’;

67 – Go to Purchasing Segmentation Tab;
68 – VIP Vendor: insert SFP on this field;
On standard view: Payment Transactions

69 – Click on Permitted Payee;
70 – Payee : fill with JP Morgan vendor number, according to supplier’s region:
2113681 | JPMORGAN CHASE BANK, NA | NAM |
2823930 | J P MORGAN CHASE BANK | EMEA |
4009699 | JPMORGAN CHASE BANK (CHINA) CO LTD | APAC |
9901018838 | BANCO J P MORGAN S A | LAM |
Save.
Now, in local systems (PF1_020 or WP1_400 depending on the system the vendor is extended to), use the transaction XK02 and do the following:
NOTE: These steps need to be performed in all company codes and purchasing organizations vendors are extended.

71 – Fill in vendor #, company code and purchasing organization.
72 - Flag the options “Payment transactions” on General Data, “Payment transactions” on Company Code Data and “Purchasing Data” on Purchasing Organization Data.
“Payment transactions” on General Data: In this first screen, perform the same changes made in PRS described in steps 67 to 70. Press enter to go to the next screen
“Payment transactions” on Company Code Data:

73 – Payment Terms: update according to the payment term sent by requester . If it is not informed, by default use Y013 (NET 90).
73.1 – Payment Method: The payment method must consider alternative payee. Vendor must always have a bank account and payment method needs to be bank transfer.
“Purchasing Data” on Purchasing Organization Data:

74 – Terms of Payment: update according to the payment term requested, by default use Y013 (NET 90);
Now on transaction Z1Y_SFP_COCKPIT_ERP on local system. Transaction will open in ‘Customizing-Alternative Payees’, just run this option:


75 – Click on ‘New entries’ and add company code, vendor # and JP Morgan’s # as payer.
Save.
NOTE: After all changes are performed, open a ticket to the Payments team to inform that a new vendor was set up as SFP.
Make sure that all information is transferred from PRS to the local systems. Joint-ventures do not participate in the program (do not update). All payment terms need to be set up equally as requested.
5.4.4 Tax number 3 – BR Vendors only
NOTE: For Brazilian Vendors only:
Independent if the vendor has or not Tax Number 3 (Inscrição Estadual or IE), it is mandatory to access their account in local system (PF1 or WP1) and make the following changes in “Brazil Tax Data”.
This access is available in both local systems. Enter with the vendor number and company code. On the second screen (Control):

76 – Click on “Brazil Tax Data”.
Fill the information in “ICMS Taxpayer”.

77 – ICMS Taxpayer:
Tax Number 3 is filled with tax number: 1 – Contribuinte ICMS;
Tax Number 3 is empty: 9 – Não Contribuinte;
Vendor from external Market (outside Brazil): EX – Operação com Exterior.
5.5 Vendor enabling - other systems
5.5.1 Transferring Vendor to WP1 (RCS)
This procedure is performed during a vendor creation or modification.
As standard the requests are received via VWF, but it is also possible to perform it manually:
After receiving a request to extend a vendor to WP1 (RCS), go to Extra Master data:

78 – Click on “Extra Master Data”.
Then go to tab “Solvay Cross. Reference.

79 – Transfer RCS: insert a “X”, to allow the system to transfer all general data to RCS;
80 – Click on “Others” Tab.

81 – RCS Vendor Account Group: Account groups in RCS are different from PRS. There is no differentiation on countries, only in type of vendors. Select the correspondent account group to the one you have in PRS. Check topic 5.2.3 for more information.
Z009 for Ordering Vendor
Z010 for Commercial Vendor
Z011 for Financial Vendor
5.5.2 Transferring Vendor to PF1_020 (PF1)
This procedure is performed during vendor creation or modification.
As standard the requests are received via VWF, but it is also possible to perform it manually:
Enter vendor set up on PRS:

82 – Click on “Extras”;
83 – Click on “Deletion Flags”;
On the next Screen:

84 – Flag General Data;
NOTE: This process may look a little odd, since we are just transferring Data and not deleting it. Be aware that some clients can get confused and ask why this flag is there.
5.6 Modifying a vendor General View
Modifications of Vendor General Data can be necessary to:
Adjust some information wrongly inserted during its creation;
Adapt any information;
Update its master records.
Any request for modification should be done via VWF tool. However, if the tool is not available, here are the main requirements for a manual modification:
The modifications are performed in PRS system and replicated to local systems by a job that runs automatically. If the job does not work, or the request is urgent, update the information in PRS and then manually directly in local system.
Note: Vendor Tax ID (1 or 2) can NEVER be changed, except if it was clearly mistyped during vendor creation, or if it was entered an invalid code (necessary to have evidence to justify this change).
If a vendor changes its Tax ID, a new vendor creation needs to be submitted via VWF. After the new vendor is created, the old one can be blocked, flagged for deletion and a comment inserted on the old vendor saying “Ticket number + Please Use Vendor ‘new number’”.
Whenever necessary to modify a vendor general data, use transaction XK02 in PRS system.
It works basically in the same way as XK01, the difference is that it is not necessary to select the account group (it cannot be changed), but select vendor number instead.

85 – Vendor: insert vendor number to be edited;
86 – General Data: select which data you want to edit:
Address: described in section 5.3.4
Control: described in section 5.3.5
Payment Transaction: described in section 5.3.6
After performing the changes, before saving, always remember to insert ticket number, which will justify the changes, on “Comments” field in Address screen.
5.7 Bank Data Maintenance
Vendor’s bank data is considered very sensitive information due to its fraud vulnerability. Data Team is a key part in the process to identify any threat and apply rules defined by Solvay Group in order to avoid any kind of attempts to enter a fraudulent bank account.
Data Team is responsible to check for duplicated bank accounts to avoid any mistake and/or double payments.
Bank data is not mandatory when registering a new vendor in the system as vendors could have other payment methods such as Check or Boleto . Because of it, the data could be added and/or updated at any time, depending on the negotiation with vendor.
Bank Information maintenance could be asked whenever:
Vendor Creation Request is received;
SBS AP Team identify that the bank data in the invoice is different from the Vendor Master data;
SBS Internal Controls Team identifies any issue with the bank account registered in Vendor Master Records;
Vendor asks to insert or change the bank data;
Buyers ask to insert or change the bank data.
5.7.1 Update/Create Bank Information
A Valid Bank Account Information usually is received in an official bank letter, header of bank statement (containing tax ID) or copy of vendor’s check. It can also be considered valid a vendor invoice or vendor information letter in PDF format. The information can reach the Data Team via email (creating a ticket), via Vendor Workflow Tool from buyers or via direct contact with GCC Team (Global Contact Center).
For all bank addition in the system, must be performed after outbound confirmation, this means that in the moment of vendor’s creation and after vendor is created, meaning if a modification is requested, the bank data MUST be confirmed by the vendor. We can accept confirmations via phone (when GCC calls the vendor and informs Data team), by email (if the sender has the same @domain as email address set up on vendor master data) or using outbound option in the VWF.
NOTE: For Brazilian vendor creation, the outbound is not required because the bank transfer is complete only if the bank account belongs to the CNPJ/CPF.
So, when the information is received directly from the vendor it can be considered valid if: received from exactly the same email address that is set up in the system or the email @domain is the same of the company. If one of these conditions is true, proceed with the bank update.
However, if the information comes from a different domain then the one registered in the system, proceed with the Outbound process to confirm the bank information directly with vendor contact already registered in SAP. This process is described in section 5.7.4.
All Bank Data are created or updated in PRS system is replicated automatically to the local systems PF1 and WP1. It is important to double check the information in order to guarantee that everything was transferred correctly to local systems.
Data Controller is allowed to change bank data format and patterns in order to adapt the bank information to the correct standards and guarantee that the payments will go trough. Meaning that the bank account will be always the same, but the format inserted in the system can be different.
Bank information is set in SAP PRS (PF1_050) system, using transaction XK02.
Note: All updates and modifications in Vendor Bank Data should be justified in a ticket or VWF and this reference number should be inserted in the Comments bar in the first screen of XK02 (Change Vendor: Address).
5.7.2 Country Specificity
In order to update bank accounts in SAP we have some specific rules that should be followed depending on the bank’s country:
5.7.2.1 United States of America
For this US example, we received vendor information in a PDF file:

87 – ABA: also presented as routing number or bank key;
88 – Account: bank account;
These information should be placed on vendor’s “Payment transactions” tab as follows:

89 – Country: bank country, in this case US;
90 – Bank Key: ABA or Routing number, must be 9 digits long;
91 – Bank Account: bank number, all digits;
92 – Bnkt: Used to fill the payment currency. Fill with the currency code + sequential number. If vendor receives in american dollars insert “USD1” (US Dollars). More information can be found on topic 5.3.6 .
5.7.2.2 Canada
The information received for Canadian bank data will be like these:

93 – Bank Number to compose bank key;
94 – Transit Number to compose bank key;
95 – Account number to compose bank account;

96 – Country: bank country, in this case CA;
97 – Bank Key: composed by Bank Number + Transit Number (9 digits total). If missing one digit, insert a 0 left before bank number;
98 – Bank Account: Bank account number;
99 – Bnkt: Used to fill the payment currency. Fill with the currency code + sequential number. If vendor receives in Canadian dollars insert “CAD1” (Canadian dollars). More information can be found on topic 5.3.6 .
For Canada we can consult bank numbers here .
5.7.2.3 Mexico
For Mexico the numbers are called Cable Interbancária , composed by 18 digits. The use of the code depends on the bank.
5.7.2.3.1 BANAMEX accounts
Example of Cable received:


100 - Country : MX;
101 - Bank Key: Swift Code BNMXMXMM;
102 - Bank Account: cuenta with 11 digits OR " Clabe Interbancária ". Use 11 digits, skip the 6 first, take 11 and skip the last one. Ex: 002821 00071690521 7
103 - AK: This field is related to the number of ‘bank references’ is used by vendor. Fill in as per rules below:
If no reference is informed, should be populated with “01” . Unless requested some specific value.
Value “99” when vendor expects our bank transfers to show a alphanumeric reference. Exemple: MXVN1234 (max 20 characters);
Value “98” when vendor expects our bank transfers to show a numeric reference. Example: 12345 (max 10 characters);
Value “97” if the vendor expects two references a numeric and an alphanumeric. Example: MXVN1234 & 12345
104 – Bnkt: Mexican pesos: MXN1; if vendor receives payment in another currency, insert it accordingly.
5.7.2.3.2 NON BANAMEX accounts
Example of Clabe received:


105 - Country : MX;
106 - Bank Key: Swift Code according to the bank (press F4 for help);
107 - Bank Account: " Clabe Interbancária " with all 18 digits.
108 - AK: same as topic 103 .
109 – Bnkt: same as topic 104 .
5.7.2.4 Brasil
For Brazilian vendors the bank data is composed by Bank name, ‘agência’ and ‘conta corrente’.
Example of bank data received:


110 – Country: BR;
111 – Bank Key: 8 digits composed by bank code with digit (4 digits) + agency (4 digits, if less than that, add ‘0’ on left);
112 – Bank Account: Minimum of 5 digits. Fill it with bank account and if less than 5 digits complete with ‘0’ on the left. Bank account digit should be disregarded at this field, check next topic;
113 – AK: Bank account digit (number after the dash). Must be two characters long and always disregard the dash. If only one digit: add it inserting a blank space in front of the number ( 6 = “ “6), if the account has two digits, add both and disregard the blank space.
114 – Bnkt: Fill with the currency code + sequential number: BRL1 (Brazilian Reais).
5.7.2.5 Argentina
For Argentina, the bank account is called Clabe or CBU and is composed by 22 digits.
Example of Clabe received:

115 – Country: AR;
116 – Bank Key: First 3 digits of Clabe . In the example: 072 0407950000000001786;
117 – Bank Account: as this field only comports 18 digits, insert the first 18 digits here and leave the last 4 for step 119 below. In the example: 072040795000000000 1786;
118 – Bnkt: ARS1 (Argentinian Pesos);
119 – Reference details: the last 4 digits of Clabe. In the example: 072040795000000000 1786.
5.7.2.6 Venezuela
In Venezuela, bank account is called Clabe or Conta Corriente and is composed by 20 digits.
Example of Clabe or Conta Corriente received:


120 – Country: VE;
121 – Bank Key: First 4 digits of Clabe . In the example: 2451 ;
122 – Bank Account: As this field only comports 18 digits, insert the first 18 digits of Clabe here, leave the last 2 for step 124. In the example: 245186235684521975 84;
123 – AK: The last 2 digits of Clabe . Ex: 245186235684521975 84 ;
124 – Bnkt: Fill with the currency code + sequential number: VEF1 (Bolivars).
5.7.2.7 Chile
There’s no specific structure for Chilean bank accounts. The Bank code in Chile is composed by 3 digits and bank account can be up to 15 digits.
Note: For bank key, use the SWIFT code. On bank master data we populate both codes: SWIFT and bank branch with the 3 digits code:


125 – Country: CL;
126 – Bank Key: swift code for the correspondent bank branch;
127 – Bank account: bank account number (without branch code);
128 – BnkT: Fill with the currency code + sequential number (Chilean pesos: CLP1).
5.7.2.8 Peru
The structure of the bank data in Peru (CCI) is composed by 20 characters, usually in this format:

3 digits of bank code. In the example: 003 -041-003001457937-19
3 digits of bank office number. In the example: 003- 041 -003001457937-19
12 digits of account number. In the example: 003-041- 003001457937 -19
2 digits of control key. In the example: 003-041-003001457937- 19
Note: For bank key, we use the SWIFT code, similar to the process for Chilean banks (topic 5.7.2.7 ). Still, when creating or searching for the bank master data, we reference the 3 digits bank code on ‘Bank Branch’ field.

129 – County: PE;
130 - Bank Key: Swift code based on 3 digits of bank code;
131 – Bank account: composed by 17 digits, disregarding the bank code (which will be placed via SWIFT code on previous step): bank office number + bank account + control key . In the example: 003- 041-003001457937-19 (disregard the dashes).
132 – BnkT: Fill with the currency code + sequential number (Peruvian Soles: PEN1)
5.7.2.9 Europe (all countries)
In Europe, the code used to pay via bank transfer is called IBAN (International Bank Account Number). It is composed by 7 to 9 blocks of numbers and usually starts with the 2 letters representing the bank’s country. Even if it is not common for vendors to inform the IBAN number in companies outside Europe all banks in the world have an IBAN.
If registering an European bank account to a vendor in LAM/NAM scope, probably the IBAN code is ready to be inserted in SAP. The information can be validated using IBAN Calculator Website .
Non European vendors that receive payments via a European account must provide the IBAN code so the account can be registered in SAP.
Example of IBAN received:

Enter IBAN on ‘Validate IBAN’ field and click on ‘validate IBAN, show BIC’ button:
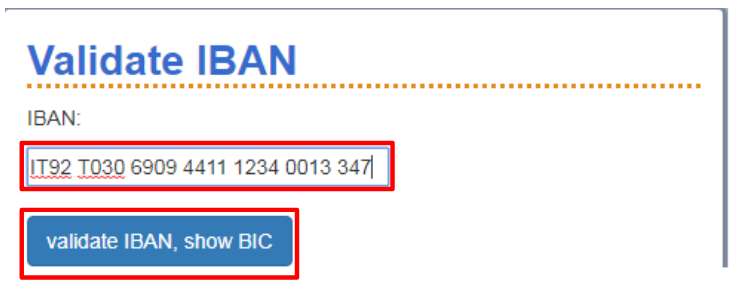
The result will inform if the IBAN code inserted is valid or not.

After validated, insert the code on vendor master data:

132 – Click on the ‘IBAN’ button;
133 – Insert the IBAN number informed;
134 – Click on Generate Bank Details to generate bank line.

System will automatically generate the bank line with all the details needed and the IBAN button will turn green.
135 – Bnkt: Fill with the currency code + sequential number (Euros: EUR1)
5.7.2.10 Other Countries
If there are not specific rules in the country of the editing bank data, these rules will be applied.

136 – Country: Fill with bank’s country code;
137 – Bank Key: Fill with SWIFT Code;
138 – Bank Account: Fill with bank account;
139 – Bnkt: Fill with the currency code + sequential number.
5.7.3 Creating a bank key on SAP - FI01
When a bank key is being used by the first time, we have to set it up on SAP so bank data transfer to other systems can run smoothly.
When you are inserting a key that has never been used on PRS, a pop up will appear requesting bank data. This is a link to the FI01 transaction, used to create bank keys.

140 – Bank name: Fill with bank name;
141 – Address information: Not mandatory, but you have bank’s address fill it in here;
142 – SWIFT: Not mandatory, but you have bank’s SWIFT code fill it in here;
143 – Bank number: Repeat the bank key you would like to create. Please note that if this information is not filled, payment will now go trough!!
NOTE : PF1_050 (PRS) and PF1_020 systems are technically the same, so if you register a key in PRS (PF1_050) it will be transferred to PF1_020, BUT NOT TO WP1!
So you need to enter the FI01 transaction and perform steps 140 - 143 there as well.
5.7.4 Outbound Process
The Outbound Process is the task performed by SBS teams to confirm the bank information directly with the vendors. The valid communication channels with the vendor are the general data registered in SAP (telephone and email).
The Outbound process will be mandatory every time a bank data creation or modification is requested, received from a third party, not directly from the vendor contact. Check topic 5.7.1 for more information. Brazilian vendor creation outbound is not mandatory.
Check below the three options we have to follow the compliance rules and get verified vendor data using the official tools.
5.7.4.1 Outbound via VWF
Once submitted, this process will send two email messages to supplier asking for collaboration. The first one contains the WebForm link where the vendor fills bank data and the second one contains the PIN code, necessary to submit the form to Solvay after filled.
When using this option, be aware that this email might reach vendor’s SPAM box.
To perform the outbound using the VWF tool, enter transaction Z1S_VWF_REQUEST on PF1_050:

144 – Check ‘Request Bank Data’ bullet;
145 – Insert the vendor number that you want to confirm bank account;
Press enter.

146 – Company Code: Insert Company Code to which the vendor bank update belongs, or the company code informed on the invoice (when applicable)
Web Form Tab: This is the tab to be filled in this type of request;
147 – Vendor Contact Name + Vendor Contact e-mail + E-mail Language: Insert your contact’s name or the company name + the email you would like to send the form + choose the language according to the supplier’s country.

148 - ‘E-mail body’ tab: This tab is only available when the VWF will be sent to vendor, and it contains the communication that will be placed on the email body;
149 – Standard message automatically sent with all bank web forms;
150 – E-mail text : Insert the additional template , making adjustments whenever necessary.

151 – ‘Banks’ Tab: This tab is also only available when the VWF will be sent to vendors.
152 – Bank data: Add the bank account you need confirmation for or leave it blank so supplier can fill in.
TIP: always ask for an attachment or supporting document with bank info, suppliers do not know how to use our country specificities to enter the bank accounts, so if needed you can correct them and fit to patterns.

153 – Communication Area: Space for internal communication - it can be accessed by Solvay employees who have access to the VWF tool.
154 – This is a free text field where any additional and relevant information can be added. It is mandatory to insert the ticket or VWF number that has generated the request to confirm the bank data in this field.
After finishing the VWF creation, click on “Save” button.
Once sent, the outbound VWF will present the status ‘Waiting for vendor to fill in form’ and will only return to our scope when they complete the filling.
The link has a validity period of 10 days, after that it will return to our inbox as ‘Vendor Webform expired’. If that occurs we can send the form one more time:

155 – Resend the webform to the same email address as before;
156 – Change the request: if needed, place another email address to send the request to using step 147 .
If no answer is received after the second attempt, when the request returns for the second time as ‘Vendor Webform expired’ a ticket should be opened via FreshDesk tool , so the GCC team can contact the vendor via phone and ask them to provide the bank details.
The VWF needs to be rejected and an the ‘Outbound via email’ started ( section 5.7.4.2 ).
5.7.4.1.1 Sending the link to another email
There are some cases where the supplier requests to Data Controller to send the WebForm link to another email address.
If the VWF is expired, just use step 156 , if it is still under vendor’s scope, proceed as below:
157 - Open the VWF and type “WF_ID” in the transaction field:


158 – Copy the request ID.
Open the transaction “SWI1”:

159 – Paste the ID and run the transaction

160 – Double click the line.

161 – Click on ‘Check Request XXX form submission’ – in the letters.

162 – Click on “Extras” and Select “Activate Administration”

163 – Select “Complete Waiting” and then Execute.
The VWF will return to Data Management queue with the status “WebForm Expired” and from this status it is possible to resend the link to another contact.
5.7.4.2 Outbound via email + GCC team
An alternative to perform the outbound is sending an email to the vendor informing that their bank account needs to be updated. It is recommended you attach an invoice or the original request to the email to make it more trustworthy. The message should be sent from the mailbox payment.securityprocess@solvay.com .
Keep the ticket with status “Need of More Information” and follow up on it every 3 days.
Simultaneously, open a child ticket to the GCC team (HD LAM/NAM) so they can contact supplier via phone as well.
The outbound follow-up is performed 3 times. If no answer is received from the vendor, contact the requester (or the last PO’s requester) asking for support.
If only the bank key is being updated, or only some adjustments are necessary to have the bank information in the correct format, the outbound is not required.
5.7.8 Checking for a Duplicate Bank Account
Data Operations Team is responsible to check if the bank information update requested is not already assigned to another vendor. This process is used to avoid that a fraudulent bank account would be assigned to several third parties.
The search of existing bank account can be made via several channels in SAP. Find below one of the options to perform this search:
Go to XK02 transaction:

164 – Select the vendor field and press F4 to open the assistance pop up;
165 – Select the ‘More function’ button;
166 – Search for the vendor by bank account or bank key.
If the results displays one or several vendors with the required bank account, the Data controller determines if the situation can be accepted or not, according to data management rules. If necessary, an outbound confirmation should be done with both vendors to grant data accuracy.
5.7.9 Remittance Address
The Remittance Address is mainly used for NAM Region. It is usually the physical address to where the check payments should be sent, it is composed by street and house number or a PO Box number.
The remittance address can be vendor itself, or another address. Whichever is identified as the remittance should be extended to a company code, as per steps below. If you create an IP, you can block the vendor for posting, since all payment transactions will be placed on the IP.
When Data Team receives a request to change, update or register an existing or new Remittance Address it is necessary to have an invoice enclosed to justify the change and it is sufficient as proof for existing address. It is not necessary to start the Outbound Process for this due to the security system regarding check payments in the US. It is not possible for someone to discount a check that is not under the correct name.
5.8 Company code maintenance
The company code is a financial entity where all Solvay payments are placed. Remember: the partner which payments go through is the one that should be extended to company code.
5.8.1 Searching for an IP vendor
Go to XK02 transaction:

167 – Add vendor and purchasing organization #
168 – Select field “Partner function”
Then press ‘Enter’ to open the partner functions. The IP can be found as below:

5.8.2 Creating a Vendor company code view – Initial screen
Once the vendor is created in PRS, go to the local system (PF1 and/or WP1 RCS) in order to create it to company code view.
Use Transaction XK01.

169 – Vendor and Company Code : insert the vendor number to be extended and the company code to be used;
TIP: In this transaction there is the option to extend a vendor using another vendor’s company code view as reference, if the vendor is already created to another Company. It will bring all Company Code View screens already filled to the vendor, with the same information mandatory in this level. It is very useful to extend the vendor for more than one company code view.
170 – In the section ‘Reference’: fill in the vendor and company code # you would like to copy from.
Press Enter
5.8.3 Creating a Vendor company code view in PF1 system
Section regarding creation of company code views will be separated by system (PF1 and WP1). Find below information for the PF1 system. (WP1 can be found on section 5.8.4 )
5.8.3.1 Creating company code view in PF1: Accounting Information
The data created in this tab is used in background by other teams and will enable the correct vendor reconciliation. Depending on the local system and company code, there are some different information to be filled.

171 – Recon. Account: It is the account on which the payments for this vendor are allocated. For PF1 always use 2300000000 for Internal Market (vendor from same country as company code) and 2300000010 for External Market (vendor from a different country from the company code);
172 – Sort Key: Indicates the layout rule for the Allocation field in the document line item:
For PF1 NAM company codes: 001,
173 – Release Group: Information filled depending on the region:
For NAM: by default use ‘ZZZZ – Normal vendor’, if informed that the vendor is included as a self billing supplier (ERS) use ‘Z004 – ERS Vendor (Automatic posting)’.
For LAM (0134): National vendor BR12004; foreing vendor BR12011
5.8.3.1.1 1099 information - company codes in PF1
The fields on this section are available only for NAM company code views in PF1.
For WP1 system check section 5.8.4.4.1 .
The 1099 form is one of several tax forms used in the United States to prepare and file an information return to report various types of income other than wages, salaries, and tips. We need to insert this information on SAP so our Accounts Payables team are aware of what vendors collect this type of taxes.
The information regarding 1099 are provided in the W9 form. We fill in the data related to 1099: If the vendor is considered 1099 receiver, fill the below fields. If not, just left they empty.
Vendors are considered reportable in all cases , except the following:
COMPANY IS NOT REPORTABLE IF: Company is a Raw Material supplier, with one of the following segment codes:
Segment code | Description |
P297 | RM - DISTRIBUTION |
P038 | RM- INDUSTRIAL GASES |
P097 | RM - RAW MATERIALS |
COMPANY IS NOT REPORTABLE IF: “C Corporation” or “S Corporation” is checked on the W-9 form, as federal tax classification;

COMPANY IS NOT REPORTABLE IF: Box “Limited liability company” is checked, AND in the comment there is the letter “S” or “C” = Corporation.

If the vendor fits in any of the scenarios above, it means that IT IS NOT REPORTABLE OF THE 1099, so no further steps are needed, go to next section ( 5.8.3.2 ).
If the vendor does not fit in any of the scenarios above, it means that IT IS REPORTABLE OF THE 1099. Then, fields below are to be filled:

174 – W. Tax Code: 00 – 1099 Misc Report;
175 – Recipient type: 19 – Other.
5.8.3.2 Creating company code view in PF1: Payment transactions
In this tab, controlling information such as payment terms and method and factoring are filled:

176 – Payt Terms: Must be filled as informed by the requester;
177 - Check double invoice: This box must be flagged. It means that the system will perform a check in order to avoid posting of the same invoice twice in the same company code;
178 – Payment methods:
NAM | LAM | ||
| Payment method: | PF1 | Payment method: | PF1 |
ACH transfer | 1 | Boleto | Y |
WIRE transfer | 8 | Bank transfer (ITAU) | 1 |
Check | 4 | Bank transfer (non-ITAU) | 0 |
Virtual Card | & | International Transfer | |
International Transfer | 3 | ||
NOTE: If Company from MX and vendor from US, the payment methods for US can be used
179 – House Bank: Should be filled with “FACT” for all vendors that will be assigned to Factoring system. Currently, only NAM company codes are being assigned to Factoring;
180 – Grouping key: Fill with 01 when payment method be Virtual Card.
Press Enter
5.8.3.3 Creating company code view in PF1: Correspondence Accounting
In this tab, the clerk's information is filled. It is used to insert remittance advice email address.

181 – Clerk’s internet: Fill here the email address to send payment advice. If vendor informs a financial or payments email address use it here, if not fill it with the email from vendor’s general data;
Note: For NAM Company Codes, we also have to update this same tab in PI1 system. In order to do that, enter the PI1 ERP, transaction FK02, enter vendor and company code and perform the same as step 181.
5.8.4 Creating a Vendor company code view in WP1 system
5.8.4.1 Creating company code view in WP1: Accounting Information

182 – Recon. Account: Always use 40100100;
183 – Sort Key: Always use 001.
184 – Cash mgmnt group: Use as follows:
A1 – Internal Market (vendor from same country as company code);
A2 – External Market (vendor from a different country from the company code);
A7 – Financial Vendors;
5.8.4.2 Creating company code view in WP1: Payment transactions
In this tab, controlling information such as payment terms and method and factoring are filled:

185 – Payt Terms: Must be filled as informed by the requester;
186 - Check double invoice: This box must be flagged. It means that the system will perform a check in order to avoid posting of the same invoice twice in the same company code;
187 – Payment methods:
| Payment method | US/CA | BR | MX | VE |
|---|---|---|---|---|
| Bank transfer | ACH - T | Transfer to Itaú - U | Bank transfer - T | Bank transfer - V |
| WIRE - V | Transfer to non Itaú - M | |||
| INTERNATIONAL TRANSFER - V | INTERNATIONAL TRANSFER - W | |||
| Others | VIRTUAL CARD - B | BOLETO - T | - | Check - C |
| CHECK - D | - | Cashier's check - D |
NOTE: If Company from MX and vendor from US, the payment methods for US can be used
188 – House Bank: Should be filled with “FACT” for all vendors that will be assigned to Factoring system. Currently, only NAM vendors are being assigned to Factoring.* When the payment method is Virtual Card Check section 5.8.6 for “Manual Exception” to finish the set up.
5.8.4.3 Creating company code view in WP1: Correspondence Accounting
In this tab, the clerk's information is filled. It is used to insert remittance advice email address.

189 – Acct. clerk: For BRAZILIAN vendors, fill in with BR;
190 – Clerk’s internet: Fill here the email address to send payment advice. If vendor informs a financial or payments email address use it here, if not fill it with the email from vendor’s general data.
Note: For NAM Company Codes, we also have to update this same tab in PI1 system. In order to do that, enter the PI1 ERP, transaction FK02, enter vendor and company code and perform the same as step 189 and 190.
5.8.4.4 Creating company code view in WP1: Withholding Tax Information
This tab needs to be filled after the last steps are completed.
You will have to save the company view in XK01, and now open in transaction XK02:

191 – Vendor + company code: Fill in with vendor # and company code you would like to update.
192 – Flag ‘Withholding tax’
In this tab we will set up the taxes that vendor collects, when informed by requester.

192 – Withholding tax country: Fill in with vendor’s country;
193 - Withholding tax type: Fill with the type of tax, press F4 for help (informed by the requester);
194 – Withholding tax Code: The complementary code indicates additional information or tax percentage, only filled in when the vendor has a unique percentage. If that % changes do not fill this field, press F4 for help;
195 – Liable: Flag this field so the tax will automatically appear when posting an invoice to this vendor and company code.
5.8.4.4.1 1099 information - company codes in WP1
The fields on steps below are available only for NAM company code views in WP1.
For PF1 system check section 5.8.3.1.1.
The 1099 form is one of several tax forms used in the United States to prepare and file an information return to report various types of income other than wages, salaries, and tips. We need to insert this information on SAP so our Accounts Payables team are aware of what vendors collect this type of taxes.
The information regarding 1099 are provided in the W9 form. We fill in the data related to 1099: If the vendor is considered 1099 receiver, fill the below fields. If not, just left they empty.
Vendors are considered reportable in all cases , except the following:
COMPANY IS NOT REPORTABLE IF: Company is a Raw Material supplier, with one of the following segment codes:
Segment code | Description |
|---|---|
P297 | RM - DISTRIBUTION |
P038 | RM- INDUSTRIAL GASES |
P097 | RM - RAW MATERIALS |
COMPANY IS NOT REPORTABLE IF: “C Corporation” or “S Corporation” is checked on the W-9 form, as federal tax classification;
COMPANY IS NOT REPORTABLE IF: Box “Limited liability company” is checked, AND in the comment there is the letter “S” or “C” = Corporation.
If the vendor fits in any of the scenarios above, it means that IT IS NOT REPORTABLE OF THE 1099, so no further steps are needed.
If the vendor does not fit in any of the scenarios above, it means that IT IS REPORTABLE OF THE 1099. Then, fields below are to be filled:

196 – Withholding Tax Country: US;
197 – Withholding tax type: FE – Federal 1099 withholding tax reporting;
198 – W/tax code: 03 – Other Income;
199 – Liable: Always flag this field.
Save.
5.8.5 Modifying a vendor Company Code View
The modifications in company code view can be necessary due to an update of information, new negotiation or to adjust system settings. In order to modify vendor’s company code information, use transaction XK02 in local system.

200 – Vendor + company code: insert vendor number and company code that you want to edit;
201 – Company Code Data: Select the data to edit from vendor.
Accounting Info: described in section 5.8.3.1 (PF1) and 5.8.4.1 (WP1);
Payment Transactions: described in section 5.8.3.2 (PF1) and 5.8.4.2 (WP1);
Correspondence: described in section 5.8.3.3 (PF1) and 5.8.4.3 (WP1);
Withholding Tax: described in section 5.8.4.4 (WP1 only).
When a bank account is added or excluded from vendor, it is mandatory to check the payment method in vendor company code view. If the method doesn’t match with the information on general view, Data Controller is responsible to adjust it. If it is made proactively, can avoid payment being blocked for payment method divergence.
Note: Payment terms changes can only be performed via VWF, so it passes by the approval of the Domain Manager.
5.8.6 Manual Exception
A vendor can be flagged as manual exception to avoid that their invoices go to factoring by mistake. This is the case for Virtual Cards and some Mexican vendors.
This flag is placed inside the vendor company code view in a part called Factoring Master Data, it is allowed only for company codes data are configured to Factoring.
Enter the company code view of the vendor:

202 – Click on this option to open Factoring Master Data options.

203 – Manual Exception flag. Should be flagged or unflagged once a request to do it is received.
5.9 Purchasing organization maintenance
5.9.1 Creating a Purchasing Organization view
The Purchasing Organization view is automatically created in local system, after the VWF is approved. If you are asked to create a GS partner (account group Z3U0 - WP1) you will need to extend it to a purchasing organization, or if eventually any issue happens with the VWF it is possible to create the view manually, using the Transaction XK01 in local systems.

204 – Vendor + purchasing organization: insert the vendor number and the purchasing organization you would like to extend it;
In this transaction there is the option to extend a vendor using another vendor’s Purchasing Organization view as reference. It will bring all Purchasing Organization View screens already filled to the vendor, with the same information already created in the referenced vendor. It is very useful to extend vendor to more than one Purchasing Organization view.
205 – Vendor + Purchasing Organization: insert the vendor and Purchasing Organization code to be referenced on the creation.
Press Enter
5.9.2 Creating a Purchasing Organization View: Purchasing data
In the first tab, the Vendor Purchasing conditions are created. It is defined by the requester and can have different data for different organizations.
In PF1 it is defined by plant. Meaning that, each code represents one Solvay plant. For WP1 RCS each purchasing organization represents a type of purchasing, the plants are defined in a sub-range category (section 5.9.4) , if none is defined, the rule inserted in purchasing organization will be applied for all plants sub-ranges available.

206 – Order Currency: currency in which PO’s will be issued;
207 – Terms of payment: According to the request, the ideal scenario is that it is aligned with the company code terms as well (section 5.8.4.2 , step 185), so the purchasing team knows exactly which one to use;
208 – Incoterms: International Commerce Terms. It defines a part of commercial agreements indicating how the goods will be delivered, where and at which cost. It is usually informed by the requester; if it is not defined, use FOB as default. The second field defines the second part of incoterms where it is determined the location where the goods will be delivered. It can be at the factory or at a specific port. This is a mandatory field, if not provided by the requester insert “.” (dot);
209 – Sales data: Not mandatory, but if informed by the requester fill it in here;
210 – GR-Based Invoice Verification: If this field is flagged it means that the Goods Receipt (GR) is mandatory to enable invoices to be posted against the PO;
211 – Auto Evaluation GR Settlement: These fields are flagged in order to enable the POs on this purchasing organization to be ERS (an automated method to post and pay invoices without any human interaction, based on the GR creation);
212 – Acknowledgment Required: This flag means that an acknowledgment is required for the POs that are generated to this purchasing organization. This is a task performed by Provisioning team and helps them to follow-up the purchasing;
213 – Automatic Purchase Order: This box flagged means that POs can be automatically generated for this vendor based on some system checks;
Note: fields 210 to 213 are usually informed by the requester or in the VWF. If not, consider 210, 212 and 213 as mandatory.
Press Enter.
5.9.3 Creating a Purchasing Organization View: Partner Function
The Vendor Partner functions are used to determine the different partners which a negotiation can have. Check section 5.3.1 to find more about the partner types.
By default system will bring same vendor number to all partner functions, it can be maintained or changed to a different number.
A vendor has only one VN #, but can have more than one OA, IP/PI and GS. Also, the Partner numbers could be different for different purchasing organization, meaning that the partner function is dependent on the p. org.
When should a different IP be created?
A different IP is created if the vendor’s remittance address is different from the VN address. In this case a new IP is created and linked to VN.
NOTE: TAX-ID SHOULD BE ADDED TO THE IP PARTY AS WELL
When should a different OA be created?
A different OA should be created in 2 cases only:
If the vendor has a specific email to which the PO needs to be sent;
If the vendor has a specific physical address to which the PO needs to be sent;
In those cases a new OA is created and linked to VN.

214 – You can replace an existing partner by overwriting it;
215 – You can add additional partners in the new lines.
5.9.4 Alternative data tab - WP1
Alternative data can be used to maintain different purchasing/partner function data for specific plants.
Any purchasing view field can be created as plant specific, but the examples below usually are most common:
A vendor is already created for required purchasing organization with USD currency, but it should be created for a different plant with CAD currency;
A vendor is already created for required purchasing organization with one payment terms, but it should be created for a different plant with specific payment terms due to a different negotiation with vendor;
Plant specific ordering address (OA party) or Remittance address (PI party) must be maintained.
Plant level is created in RCS as an addition to an already existing purchasing organization.
Enter in vendor’s purchasing organization level
Choose “Different data”:

After confirming that is necessary to define a new alternative data, it is possible to select the plant in the next tab.

216 – Plant: select the plant code to create an alternative data to;
217 – Alternative data:
Purchasing data - to select different purchasing data to the plant (currency, terms, etc.). Check section 5.9.2 ;
Partner Functions - to add different partner functions to the specific plant. Check section 5.9.3 .
The same purchasing view is displayed, the only difference is the plant number below Purchasing organization number, showing the data for the specific vendor, in a specific P.Org and a specific plant.
5.9.5 Modifying a vendor at Purchasing Organization level
The modifications of a purchasing organization view can be needed due to an update of information, new negotiation or to adjust system settings. In order to modify vendor’s P.Org information, use transaction XK02 in local system.

218 – Vendor: insert vendor number to edit;
219 – Purchasing Organization: Insert the Purchasing organization to edit;
220 – Purchasing organization data: Select the data to edit from vendor.
Press enter
5.9.6 Setting a vendor as ERS
ERS - Evaluation Receipt Settlement – Self billing invoices automatically generated after the receipt of the goods.
The vendors are set up as ERS in both systems in Purchasing Organization view, transaction XK02.
In order to set up a vendor as ERS, enter in the Purchasing Data with the Purchasing Organization requested.

221 – These five boxes should be flagged in order to define a vendor as ERS.
Make sure that all partners are set up correctly, and then send an email (via ticket) VN number, IP number, Purchasing Organizations and Company code to the AP team so they can add vendor in the MRM2 table.
5.10 Financial vendor (FI) addition to ZWFA05Q table: WP1/NAM only
Process used in WP1 RCS only – Whenever a new financial vendor is created (account group Z011) it should be added to the table ZWFA05Q in WP1. This list determines suppliers which do not require PO’s.
FI Vendors: Also called miscellaneous (MISC), the vendors created as FI are usually creditors, not companies, to whom Solvay needs to pay an amount (tax payments, donations, etc) but there is no commercial transaction involved (Solvay does not receive any services or products for it). POs are not generated to this group of vendors and the costs are usually allocated directly in G/L Accounts and Cost Centers.
A Standard vendor can be also a financial vendor, if there is already a standard vendor created with exactly the same data, check if it is really necessary to create a new FI vendor. If not we can use the same vendor number that already exists, since Z010 vendors can be added to the FI list upon special request from finance (e.g. utility vendors that do not have PO’s). Such requests should be approved by the site controller or domain manager.
However, a financial vendor cannot be used as standard. If the vendor is created as FI, using account group Z011, it will never be possible to issue POs for this vendor. In cases like this, it is necessary to create a new vendor, with Account Group Z010, even if the information will be duplicated.
Open Transaction ZWFA05Q in WP1:

222 – Click on New Entries button.
223 – CoCd and Vendor: insert the company code data and vendor number according to the request received.
Save.
5.11 Open Items check: used on vendor inactivation
If you identify that an existing vendor should be deactivated (blocked or deleted) or receive a request to block or delete an active supplier, a parallel procedure is needed to ensure that no purchasing documents from that vendor are open.
Once blocked/ deleted, no changes can be made on the vendor’s purchasing documents, not even deletions! So make sure the vendor is % clean before inactivate it.
Purchasing documents can be: PIRs (purchasing info records), contracts, POs (purchasing orders) and invoices. Each one is described below:
5.11.1 Check for open PIRs (ME1L)
Info Records can be seen using transactions ME1L .

224 – Insert the vendor number that is to be inactivated;
225 – Run the transaction.

226 – PIR number;
227 – Purchasing organization indicator;
228 – Plant indicator;
229 – Deletion indicator (for plant 0154)
230 – Validity indicator (for plant 7666)
When reviewing the results of the report please keep in mind the following:
Info Record can have a deletion flag at master level and/or at purchasing level.
Info Record can also be inactive (example: without price). For these cases PIR should not be replicated to the new vendor.
Only active Info records should be considered for replication (and only if the vendor in process of deletion is being replaced by a new one).
Approval from the storeroom manager/ buyer in charge should be received before replicating the PIR for the new vendor number.
5.11.2 Check for active contracts (ME3L)
For vendor inactivation, it is also necessary to check if there are active contracts. This can be done using transaction ME3L .

231 – Add vendor number;
232 – Select ‘Choose…’;
233 – Select ‘Contract’;
234 – Continue;
235 – Run the transaction;
Check which contracts are still valid (the validity date can be found on the header of the document). In order to replicate an active contract for new vendor number an approval from the responsible buyer needs to be arranged.
5.11.3 Check for open POs (ME2L)
Open PO’s can be located using transaction ME2L .

236 – Add vendor number;
237 - Selection parameter: WE103 (only open orders)
238 – Select ‘Choose…’;
239 – Select ‘Pur. Order’;
240 – Continue;
241 – Run the transaction;
For PO’s transfer, contact the Provisioning teams (via ticket).
In cases when there is an output from the system, the supplier should be only blocked, not marked for deletion. Deletion flag can only be applied when all PO’s are invoiced.
5.11.4 Check for open invoices (FBL1N)
Use transaction FBL1N to check for open invoices.

242 – Insert vendor #;
243 – Insert company codes (all the companies that vendor is extended);
244 – Select ‘Open Items’ ;
245 – Run the transaction;
If you receive notification, there are no open invoices for this vendor code.
In case of open invoices, they will be shown here. If necessary contact the Accounts Payable teams for invoice transfers from a vendor to another:

Note: Please note that this report might miss invoices already posted and pending for payment. Another check should be done in PI1_020 system using the same transaction.
Different company codes are being used in PI1 (depending on region). Payments that are made to US/CA banks are handled in 4044 company and payments made to European banks are handled in 0231 company.
5.12 IDocs management
IDoc stands for "Intermediate Document",no and it is a data container used to exchange information between two systems which know how to interpret that data. In the SAP System, I DOCs are stored in database. Every IDOC has a unique number(within a client).
5.12.1 Checking issues in existing IDocs
Sometimes changes performed on PRS will not be automatically duplicated in local systems. The reason for these errors can be found on transaction BD87 .

245 - Select the date when the changes were done;
246 - Set PRS_020 as the Partner System.

247 - Click ‘Application documents not posted’ and double click ‘Z_CRE_RCS’;

248 - Double click the Idoc number;
In Data records is the vendor number to which this IDoc is related.

249 - WP1 vendor number to which the IDoc is related;
The messages should be checked one by one until the culprit be found and the issue corrected.
If after the correction of the issue, the changes still are not being transferred to RCS a new IDoc needs to be created in PRS transaction BD14 .
Following information must be populated:

250 - PRS vendor number;
251 - Message type – Z_CRE_RCS;
252 - Target system – WP1_400
6. Operational Procedure on Vendor WorkFlow Tool
The Vendor Workflow tool is applicable to all companies in PF1_020, PI1_020, WP1_400 and RHO_020 even though the companies are joint ventures.
The Vendor Workflow tool is applicable to all vendor types: vendors and also financial suppliers, created for refund payments or for tax records (created in the ZZCD account group).
The profile of users requesting multiple vendors is now restricted to the ZZCD account group.
The training kit is limited to commercial sellers because it is developed for purchase (ie not financial).
6.1 VWFs categories
Create a new Vendor (without webform) – The requester fills out all the information to create the new vendor. For this kind of request, bank data should be sent attached or written inside the comments tab;
Create a new Vendor (with webform) – The requester fills out some basic data and send a link to supplier to fill out the main information as address, bank data, contacts and name;
Modify an existing Vendor – The requester can change or add vendor information as address, name, contacts and purchase organization.
6.2 Process Flow
The Requester starts the process of Vendor Workflow in Solia Services Portal , justifies and submits vendor creation. They may also include comments to vendor in the web form and/or to approver and data controller;
The Approver (set within the matrix ) validates the name, location, segment, payment terms, incoterms and all general information set up by the requester.
Then the approver releases the request: allows the VWF to be sent to vendor (in case of Webform) or to Data team (in case of manual submission), returns the VWF to requester (if any questions come up or there is incomplete/ incorrect information) or rejects the request (if vendor creation/ modification is not approved).
In case of Webform (session 6.5.8 for more info):
The Vendor fills the information in the web form and submits it to Solvay (when the form is sent by the requester to the vendor); they only have access to General data and bank data. They are automatically reminded after 5 days and by Data Controller after 10 days.
After Webform submission or approval:
The Data Controller checks for duplicate vendors and validates if all data is in accordance with procedures, standards and compliance matters. Then Data Controller releases the request: approves vendor creation/ modification, returns the VWF to requester (if any questions come up or there is incomplete/ incorrect information) or rejects the request (if vendor creation/ modification is not approved).
The Batch (system) transfers the new vendor created to PF1 or WP1 as per web form/ VWF. Requester receives an automatic confirmation from the system once vendor number is created.
The Data Controller manually creates the company views.
6.3 SAP Business Workplace in PRS environment (SBWP)
The PRS (PF1_050) client is integrated in the PF1_020 and WP1 systems and is the general system for vendor master data maintenance (except for company codes and purchasing organizations).
All VWF received by the Data team and ready to approve are located in the ‘VWF inbox’ that can be accessed via SBWP transaction.

256 - To ascend to the VWF inbox, type the transaction or click the ‘inbox’ button on your SAP home page;

257 - Then enter your Workplace, your inbox and select ‘Workflow’
When selecting a request, it is possible to check some basic information from the request such as vendor code, company code selected, requester, etc.

Select the request that are within the scope and double click on it.
The request will pop and you can check some basic data from the request in the header, which can be populated by the requester or automatically.

257 – A brief description on what is requested;
258 – Request/ VWF number and Request Status;
259 – Requester info: Name, phone and email;
260 – Vendor’s Segment Code, Company Code and Business Unit;
261 - See in who’s queue the VWF is placed
Note: When entering a request via SBWP it will be stuck in your queue, be careful to not enter VWF that are not under your scope and lock them in your inbox. Check section XXX for more information on just visualizing requests, and section XXX for removing a VWF from your queue.
Also in the header of the VWF there is a group of buttons that command the actions to be taken in the request.

262 - All the VWF’s logs (the steps it took until now);
263 - Approve the VWF (only after all checks are ok);
264 - Reject the VWF: It opens a new window requesting a message that will be sent to requester. Here we explain why the request is being rejected;
265 - Edit the request: VWF they should be edited to fit information to our patterns;
266 - Available only for modifications: Check the modifications that are being requested;
267 – Available only for creation requests with webform: When the webform link is sent to supplier and they do not answer within 3 days, D&A Team should send it again to supplier by clicking on this button.
268 – Return the VWF to the requester: A new window is opened and a message should be written to the requester explaining why the request is being returned. The VWF Request is returned whenever it’s necessary to ask for any additional information or an action from the requester. Note that when using this option, the request needs to be submitted again;
6.4 Necessary checks before approving a request for a new Vendor record
The mandatory information must be provided on the VWF request. The checks listed must be performed, and if necessary the master data of the vendor has to be updated.
First of all, check section 5.2 on this document to perform the preliminary checks on vendor maintenance:
Searching for an existing vendor in PRS, PF1 and RCS: section 5.2.1
Mandatory documentation for vendor creation: section 5.2.2
United States: section 5.2.2.1
Brazil: section 5.2.2.2
Mexico: section 5.2.2.3
6.5 VWF tabs
This section will explain the usage of each existing tab on the VWF and the procedures to be applied on them. Generally, these are the tabs that may be shown on a VWF request:

Note that are VWF that will not show all of them, check below for specifics.
6.5.1 ‘General data’ tab on VWF
This is the first tab on the VWF screen and it contains vendor’s main information such as account group, name and address. It should be analysed according to section 5.3 .
Remember to check special characters, match vendor’s name with mandatory documentation and apply the rule where there must be only ONE vendor per tax ID. All additional addresses must be set as OAs/ GS/ IPs.

269 – Reason of change: shown only for modification requests and not mandatory to be filled by requester;
270 – Account group: check section 5.2.3 for more information
271 – Vendor name: four lines with a 35 maximum characters limit. Name must match official vendor documentation;
272 – Search terms 1 and 2: key word to vendor’s name (10 characters max) / if vendor is used for a specific party (VN, OA, IP, GS), insert it here;
273 – Physical address: for VNs must contain the headquarters address, for other parties any address is allowed;
274 – PO box address: if different from main address (as in the example), delete this information and create an IP with the PO box information;
6.5.2 ‘General data 2’ tab on VWF
In this tab there is vendor’s Tax information. Each country/region has a specific code, depending on the official document to be placed. Check session 5.3.5 for more information.

275 – Tax information: depending on the country. Check session 5.3.5 for more information;
276 – Natural person: Flag in case of a socal tax number indicating a person, not a company (security number/ CPF);
278 – SCAC code: Not mandatory, check session 5.3.5 for more information;
279 – DUNS code: check session 5.4.1 for more information;
6.5.3 ‘Phone/ Fax/ Mail’ tab on VWF
On this tab are registered the telephone, mobile phone, fax numbers and email addresses. Check these fields to grant that it was filled without the country code number and also without any special character. More than one phone/mobile phone/fax/mail can be entered; however one of them has to be defined as default.
It is mandatory to have at least one phone # and one email address.

6.5.4 ‘Distribution’ tab on VWF
This is the tab where the requester choses for which system the vendor should be sent: ERP (PF1) or RCS (WP1_400)

280 – This is where requester selects the system;
281 – RCS vendor code: if a different vendor number is correspondent in WP1 this is where it shows / Tft RCS: an ‘X’ must be placed in order to grant WP1 transferring, meaning that all general data should be transferred from PRS to RCS;
6.5.5 ‘Communication’ tab on VWF
In this tab, the requester may insert any additional information or instructions regarding the creation of the vendor. The messages could be directed to the Data team or to the approver. Usually extensions to company code, bank data and withholding tax information are inserted here.

6.5.6 ‘File Attachments’ tab on VWF
The W-9 Form, the Vendor Enrollment Form, Bank details and any other documentation that is considered relevant, such as e-mails, government and other legal documents have to be attached in this tab.
Note! On creation VWFs it is mandatory to have W-9 Form for US vendors and RFC document for MX Vendors. Also, for modification on address of US vendors W9 is also mandatory.

6.5.7 ‘Purchase’ tab on VWF
In this tab the requester selects all the Purchase Organizations to which the vendor should be extended. All information regarding Purchasing view are filled in this tab.
The Purcahsing view is automatically created when the request is approved.

282 – Target System: Local system selected to transfer the vendor;
283 – P.Org: Purchasing organization chosen to extend the vendor;
284 – Terms of payment: According to the request;
285 – Incoterms/ Incoterms 2: International Commerce Terms. It defines a part of commercial agreements that indicates how the goods will be delivered, where and at which cost. It is usually informed by the requester; if it is not defined, FOB is used as standard / Incoterms 2: Second part of Incoterms where is determined the location where the goods will be delivered. It could be at the factory or at a specific port. This is a mandatory field, if not provided by the requester insert “.”;
286 – Currency;
287 – Flags on purchasing level : filled in by the requester, as per purchasing needs.
Note that all other fields can be populated as well.
Once all tabs are reviewed, proceed with the VWF approval/ rejection/ reuturn.
6.5.8 VWF tabs in Webform requests
Different from the previous Form, on this type of request the vendor is responsible to fill in some fields. The tabs in this request are pretty much the same as the ones described in section 6.5 with addition of three tabs more that will be described below.
6.5.8.1 ‘WebForm’ tab on VWF
This is the tab where the vendor fills their Name and contact, the information filled in this tab is replicated to General Data tab (Attention to remove the special characters whenever necessary). If opening a webform, this is where we place vendor’s email that should receive the form.
Check section 5.7.4.1 for more information on this tab.

6.5.8.2 ‘Email body’ tab on VWF
Email sent to the vendor and any other email sent related to this request.
Check section 5.7.4.1 for more information on this tab.
6.5.8.3 ‘Banks’ tab on VWF
In the tab “Banks” the vendor is able to fill their bank account.
Check section 5.7.4.1 for more information on this tab.
NOTE: Data Controller is not able to insert, change or delete bank data in VWF to create a new vendor with web form. The bank data should be managed through transaction XK02 explained on this document to according to the rules described in section 5.7 .
6.5.9 Blocking/unblocking and marking/un-marking for deletion
The requester is able to submit a Block or Unblock request via VWF; however this option works only for purchasing organization level.
If all purchasing organizations are blocked or unblocked, the deletion flag is automatically set by the system. If not, no deletion flag will be set automatically.
Request to set deletion flag or to block/delete vendor in general view should be communicated in Communication Area tab or sent via FreshDesk ticket.
Appendix
PtP Portal - https://sites.google.com/a/solvay.com/sbs-procure-to-pay-portal/home
Zip Code Confirmation - http://www.zipinfo.com/search/zipcode.htm or http://www.unitedstateszipcodes.org/
DUNS Code - https://solutions.dnb.com/grs/
More useful Sites https://docs.google.com/document/d/1fQN6PFkTHLnfQNn4J6oKSs8ag-Dm5o1ozpuCTxcFDFA/edit
The complete list for Brazilian banks can be found here .
End of document